Yet another NEW section!
Spangiepantz Adaptations
Basically, I find recipes on the internet and follow them, and then make a pictorial guide if they are successful!
I finally decided to do an internet search for one of my most FAVOURITE dishes ever, Chicken Katsu! And I found this one, which was absolutely spot on! Well, it was close enough anyway. :P


SO here's a pictorial guide to the actual recipe, although my version is tweaked just a little bit.
~
!Chicken Katsu!
First of all:
Ingredients
Spangiepantz Adaptations
Basically, I find recipes on the internet and follow them, and then make a pictorial guide if they are successful!
I finally decided to do an internet search for one of my most FAVOURITE dishes ever, Chicken Katsu! And I found this one, which was absolutely spot on! Well, it was close enough anyway. :P

SO here's a pictorial guide to the actual recipe, although my version is tweaked just a little bit.
~
!Chicken Katsu!
First of all:
Ingredients

1. Panko bread crumbs
2. Chicken breasts/ steaks/ tenderloins
3. Eggs
4. Salt & Pepper (to taste)
5. All-purpose flour
6. Canola oil
7. Tonkatsu Sauce
8. Japanese Mayo
The last 2 aren't the main ingredients, they're just the sauces that go with the final product! :)
With the chicken, I usually use chicken tenderloins or chicken steaks because I find them easier than chicken breasts, which are quite often pretty thick.. So these are thinner! :) But whatever floats your boat :P
I don't follow the actual measurement for the flour and egg, just because it really depends on how much chicken you're coating.. :) But if you wanted to, it's one egg and 15grams of flour.
ANYHOW.
To begin!
Step 1:
 Wash your chicken! :)
 Scrub 'em up good and then after that, drain the water, and attempt to get every bit of water out!
Step 2:
 Sprinkle as much/as little pepper you want on the chicken.
 Followed by salt. I usually put about a teaspoon in, but sprinkle to your tastes!
 Rub the salt and pepper into the chicken well, and then leave aside for about 5 minutes.
Step 3:
 While the chicken is soaking in the salt and pepper, prepare the coating apparatus! :P
Usually, I put the flour and egg into shallow dishes & bowls, and the panko bread crumbs on a plate.
 Eggies. I used 2 as I had quite a number of chicken tenderloins..
 Whisk up the egg/s with a fork.. Or an egg whisk. Whatever pleases you.
 Then pour out the crumbs onto the plate. You can keep pouring some out while you are coating so don't overpour.
 Pat the crumbs flat.
Set up the "coating station"
 Flour first, then egg, then lastly, crumbs.
Step 4:
 Get the chicken
 Roll it around in the flour so that the whole piece is covered in flour.
This will ensure that the egg actually sticks to the chicken.
 Then dust off the extra flour, you don't want too much flour!
Step 5:
 Dunk the flour-ed chicken into the egg. Make sure all the chicken is covered, so the bread crumbs will stick to it!
Step 6:
 Next comes the bread crumbs. Throw the chicken on on one side, then grab some crumbs and toss it onto the top, and rub them in so they stick well.
 Now this will get messy, so I recommend paper towels on standby or you just keep going to the sink to wash off the nasty goo off your fingers. Mmm how appetizing. :P
Step 7:
 Place the crumbed pieces onto a plate in preparation for cooking.
 Step 8:
 When you have done just about all the pieces, get some canola oil and pour it into a frying pan.
 Just enough to sort of shallow fry the pieces. Well, abit more oil than shallow fry but not as much as a deep fry.

 Put it over a low-ish flame. You want the oil to heat slowly so it doesn't burn the crumbs and leave the inside raw.. Because that's just nasty.
Step 9:
I'd recommend setting up a plate beside the frying pan with pieces of kitchen towel on it to soak up the oil from the finished pieces, but you don't have to if you prefer to have oil rigs in your mouth.
 This is Handee :D
 When you feel enough heat radiating off the pan, it's time to start a-cookin! :D
 Place as many chicken pieces as possible in the pan.
 I just keep using the same pan when the pieces are done until the whole batch is complete.
 Leave them in there until the bottom side is a nice golden brown, then flip them onto the other side to cook.
I use wooden chopsticks to turn the pieces, it seems to be easier than using a spatula.
 Repeat step until whole batch has been cooked. :)
Step 10:
 Remove the chicken and let the oil soak into the paper towel.
With the chicken, I usually use chicken tenderloins or chicken steaks because I find them easier than chicken breasts, which are quite often pretty thick.. So these are thinner! :) But whatever floats your boat :P
I don't follow the actual measurement for the flour and egg, just because it really depends on how much chicken you're coating.. :) But if you wanted to, it's one egg and 15grams of flour.
ANYHOW.
To begin!
Step 1:
 Wash your chicken! :)
 Scrub 'em up good and then after that, drain the water, and attempt to get every bit of water out!
Step 2:
 Sprinkle as much/as little pepper you want on the chicken.
 Followed by salt. I usually put about a teaspoon in, but sprinkle to your tastes!
 Rub the salt and pepper into the chicken well, and then leave aside for about 5 minutes.
Step 3:
 While the chicken is soaking in the salt and pepper, prepare the coating apparatus! :P
Usually, I put the flour and egg into shallow dishes & bowls, and the panko bread crumbs on a plate.
 Eggies. I used 2 as I had quite a number of chicken tenderloins..
 Whisk up the egg/s with a fork.. Or an egg whisk. Whatever pleases you.
 Then pour out the crumbs onto the plate. You can keep pouring some out while you are coating so don't overpour.
 Pat the crumbs flat.
Set up the "coating station"
 Flour first, then egg, then lastly, crumbs.
Step 4:
 Get the chicken
 Roll it around in the flour so that the whole piece is covered in flour.
This will ensure that the egg actually sticks to the chicken.
 Then dust off the extra flour, you don't want too much flour!
Step 5:
 Dunk the flour-ed chicken into the egg. Make sure all the chicken is covered, so the bread crumbs will stick to it!
Step 6:
 Next comes the bread crumbs. Throw the chicken on on one side, then grab some crumbs and toss it onto the top, and rub them in so they stick well.
 Now this will get messy, so I recommend paper towels on standby or you just keep going to the sink to wash off the nasty goo off your fingers. Mmm how appetizing. :P
Step 7:
 Place the crumbed pieces onto a plate in preparation for cooking.
 Step 8:
 When you have done just about all the pieces, get some canola oil and pour it into a frying pan.
 Just enough to sort of shallow fry the pieces. Well, abit more oil than shallow fry but not as much as a deep fry.
 Put it over a low-ish flame. You want the oil to heat slowly so it doesn't burn the crumbs and leave the inside raw.. Because that's just nasty.
Step 9:
I'd recommend setting up a plate beside the frying pan with pieces of kitchen towel on it to soak up the oil from the finished pieces, but you don't have to if you prefer to have oil rigs in your mouth.
 This is Handee :D
 When you feel enough heat radiating off the pan, it's time to start a-cookin! :D
 Place as many chicken pieces as possible in the pan.
 I just keep using the same pan when the pieces are done until the whole batch is complete.
 Leave them in there until the bottom side is a nice golden brown, then flip them onto the other side to cook.
I use wooden chopsticks to turn the pieces, it seems to be easier than using a spatula.
 Repeat step until whole batch has been cooked. :)
Step 10:
 Remove the chicken and let the oil soak into the paper towel.
AND FINALLY
Serve up the chicken cut into pieces, with steamed rice, furikake (Seaweed seasoning), tonkatsu sauce and japanese mayo! :D
Serve up the chicken cut into pieces, with steamed rice, furikake (Seaweed seasoning), tonkatsu sauce and japanese mayo! :D
 This is a delicious meal, extremely easy to make and on the whole, something everyone will appreciate! :)
You should be able to find Tonkatsu sauce and japanese mayo at your nearest oriental store! :) They're delicious sauces to go with the chicken!


 Basa fish fillets


 Step Three:
 Step Four:
 Press down on the fish for it to cook evenly on the inside.
 It should be golden, a little less golden than this (it's only this yellow because of the lighting!)
 Mmm look at that fish :D
 MMMMMMMMMMM.... Deliciouso:D
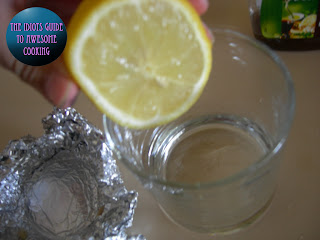
 If you don't like to drink water because it tastes strange, add some lemon juice and you'll be refreshed in no time :D And cold water always tastes better :D
 Step Three:
 About this much oil should suffice. Note the non-stick deep frying pan too!
 Flame should be about this high.
 Step Five:
 which is the second station. Thoroughly rub the flour into and onto the fish piece, making sure that the entire piece is covered. This step should only be done just before the pieces go into the hot oil.
 Step Six:
 Step Seven:


 FINITO!